Before You Wire a Single Panel: The RV Solar Conversion Secrets Dealers Skip Over
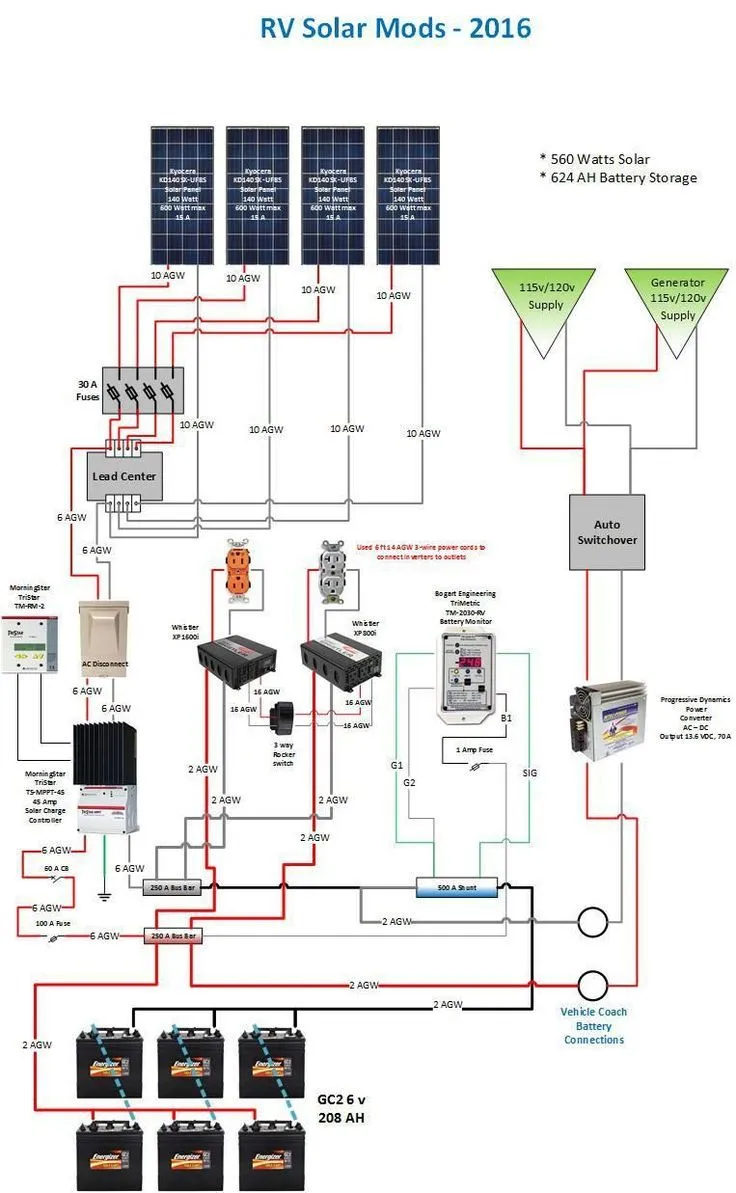
Photo: RV rooftop solar panel installation wiring, via i.pinimg.com
Everybody loves the idea of rolling down the highway powered by the sun. No hookup fees, no noisy generator, no hunting for a campsite with 30-amp service. And sure, a 12-volt solar setup on an RV genuinely delivers all of that—but only when you do the conversion right. The problem? Most of the critical stuff doesn't come up until after you've already spent money in the wrong places.
We've talked to dozens of RV owners who've been through the conversion process, and the story is almost always the same: the panels were the easy part. It was everything else that got expensive. Here's what they wish they'd known first.
Your Wire Gauge Is Probably Too Small
This one quietly ruins more solar builds than any other single mistake. When you're running 12-volt DC power across an RV, distance matters enormously. A wire that's perfectly adequate for a short run from your battery to a light switch becomes a serious liability when you're pulling current from rooftop panels all the way down to a battery bank under your bed.
Undersized wiring creates resistance, and resistance means heat and power loss. A 10-gauge wire might handle your panel's rated output just fine on paper, but if your run is 15 feet or more, you're already losing efficiency—and potentially creating a fire hazard over time.
The fix: Use a voltage drop calculator before you buy a single foot of wire. Most experienced installers recommend keeping voltage drop under 3% on any given run. For longer distances, that often means stepping up to 8-gauge or even 6-gauge wire. Yes, it costs more. It costs a lot less than rewiring the whole rig six months later.
Parasitic Drain Is Bleeding Your Battery Without You Knowing
You park for the night, everything looks good, and by morning your battery bank is noticeably lower than it should be—even accounting for overnight usage. Welcome to the world of parasitic drain.
Modern RVs are loaded with systems that quietly sip power around the clock: propane leak detectors, CO monitors, stereo memory, slide-out control boards, and even some refrigerators in standby mode. None of these are huge draws individually, but add them up over 8–10 hours and you can easily lose 10–20 amp-hours you weren't budgeting for.
Before you size your battery bank, spend an afternoon with a clamp meter measuring the actual resting draw of your RV's systems. This is called an idle current audit, and most installers skip it entirely. You might discover that your "50Ah daily usage" is actually closer to 70Ah once the invisible draws are factored in. That changes your panel count, your battery sizing, and your controller specs—all at once.
Charge Controller Compatibility Isn't Automatic
Not every MPPT controller plays nicely with every battery chemistry, and this is a surprisingly common source of frustration. If you're running lithium iron phosphate (LiFePO4) batteries—which are increasingly popular for RV builds—your charge controller needs to be explicitly compatible with lithium charging profiles.
A controller set to AGM or flooded lead-acid charging parameters will either undercharge your lithium batteries (leaving capacity on the table) or, in some cases, damage them over time by pushing voltage too high. Some budget controllers don't offer a true lithium mode at all—they just relabel an existing profile.
Always verify that your specific controller model supports your specific battery chemistry with a programmable voltage profile, not just a generic "lithium" label. Reputable brands like Victron, Renogy, and EPever all offer controllers with genuinely configurable parameters. Budget brands are hit or miss. Check the manual, not just the product listing.
The Real Cost Breakdown Nobody Shows You
Here's a rough breakdown of what a mid-range 400W 12-volt RV solar conversion actually costs when you account for everything:
- Panels (2x 200W): $250–$400
- MPPT charge controller (40A): $120–$200
- Battery bank (100Ah lithium): $300–$600
- Wiring, connectors, fuses, bus bars: $80–$150
- Roof mounting hardware and cable entry glands: $60–$120
- Inverter (if needed for AC loads): $100–$300
- Monitoring shunt and display: $30–$80
Total range: $940–$1,850
Most online guides quote the panels and controller, call it a day, and wonder why readers feel blindsided. The wiring and hardware alone regularly run $150–$250 when you do it properly. Budget for the full system, not just the headline components.
Roof Penetrations and Sealant: Don't Cheap Out Here
Water intrusion is the silent killer of RV solar installations. Every cable entry point, every mounting foot, every screw that goes through your roof is a potential leak waiting to happen—especially as the RV flexes on the road and sealants age.
Use a self-leveling lap sealant like Dicor for rubber roofs, and use it generously. Inspect every penetration annually. Many RV owners who've had solar installed professionally still end up with water damage within two or three years because the installer used generic silicone or skipped proper self-leveling sealant entirely.
Also: run your cables through a proper cable entry gland, not just a hole stuffed with sealant. Glands provide a clean, serviceable entry point and do a better job of keeping water out over time.
One Last Thing Before You Buy Anything
Do a load audit first. Write down every electrical device in your RV, how many watts it draws, and how many hours per day you realistically use it. Add it all up. That number—your daily amp-hour requirement—is the only honest starting point for sizing a solar system that will actually meet your needs.
Skip this step and you're just guessing. And guessing is how people end up with a 200W panel trying to run a 12-volt compressor fridge, an air mattress pump, and a laptop—and wondering why the batteries are dead by 9 PM.
The sun is free. The system that captures it isn't. Build it right the first time and it'll pay for itself. Build it wrong and you'll pay for it twice.